|
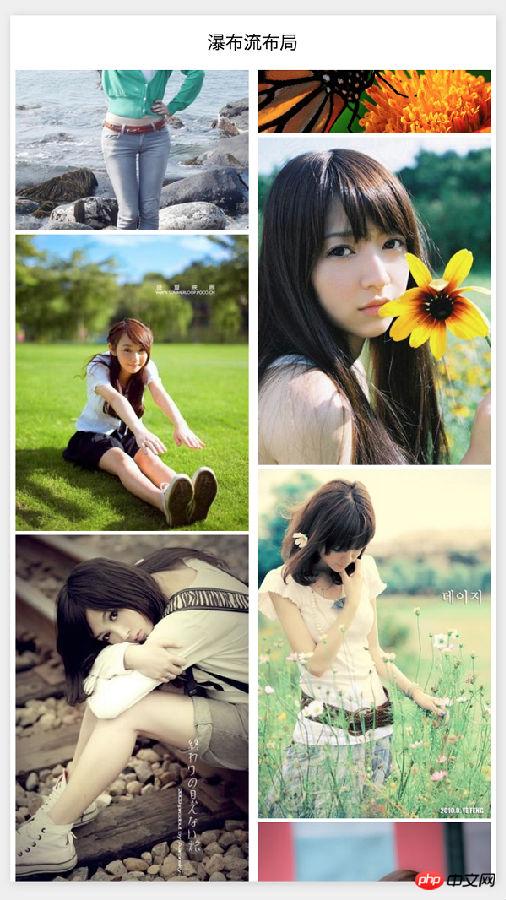
���x��С�����QС����Ӣ����Mini Program����һ�N����Ҫ���d���b����ʹ�õđ��ã������F�ˑ��á��|�ֿɼ����ĉ��룬�Ñ���һ����һ�¼��ɴ��_���á�С������һ�N�������d����ʹ�õđ��ã�Ҳ��һ... ��С�����QС����Ӣ����Mini Program����һ�N����Ҫ���d���b����ʹ�õđ��ã������F�ˑ��á��|�ֿɼ����ĉ��룬�Ñ���һ����һ�¼��ɴ��_���á�С������һ�N�������d����ʹ�õđ��ã�Ҳ��һ��T���dz��ߵĄ��£����^��������İlչ���ѽ��������µ�С�����_�l�h�����_�l�����B�� �ٲ���������һ�N���^���е���沼�ַ�ʽ������͵ľ���Pinterest.com��ÿ����Ƭ�ĸ߶Ȳ���һ�ӣ��γ�һ�N����R�����С� ��HTML5�У��҂������ҵ��ܶ����jQuery֮��F���ٲ������ֲ�����p�������@�ӵIJ�����ʽ������С�����У��҂�Ҳ���������@�ӵ�Ч�������^����С�����ܵ�һЩ���ԣ��ڌ��F˼·��߀����һЩ��e�ġ� �����҂��́���һ�������С������ȥ���F�@�N�ٲ������֣�
С�����ٲ������� �҂�Ҫ���F����һ���̶�2�еIJ��֣�Ȼ�DƬ�����ӑB���d�M�@������(�����d�M���ĈDƬ���������DƬ���H�ijߴ磬��Q�������Ƿ�������߀��������)�� /* ���DƬ�����Ę�ʽ */.img_item { width: 48%; margin: 1%; display: inline-block; vertical-align: top; �҂�֪������HTML�У��҂�Ҫ�ӑB���d�DƬ��Ԓ��ͨ����ʹ��new Image()����һ���DƬ����Ȼ��ͨ�^����ӑB���dһ��urlָ��ĈDƬ�����@ȡ�DƬ�Č��H�ߴ����Ϣ������С�������У����]���ṩ������JS�����̎��DƬ���d���䌍�҂����Խ���wxml�е�<image>�M��������@�ӵĹ��ܣ��mȻ���c�@����߀���ܝM���҂��Ĺ���Ҫ��ġ� <!-- ������Ϸ�һ���[�^����image�M��ȥ���dһ��������DƬ�YԴ --><view style="display:none"> �҂�������Page��ͨ�^��������������fҪ���d�ĈDƬ��Ϣ��wxml�У�<image>�M��ȥ���d�DƬ�YԴ��Ȼ�DƬ���d��ɵĕr��ͨ�^bindloadָ�����¼�̎�����������Mһ��̎���� �҂�����һ��Page�ļ��ж��x��onImageLoad�����������У��҂����ԏĂ�����¼�����e�ϣ��@ȡ��<image>�M�����S����Ϣ������ͨ�^�����d�M���ĈDƬ�Č��H��С��Ȼ���҂����DƬ��������ό��H��Ҫ�@ʾ�ijߴ磬Ӌ���ͬ�����s�ź�ijߴ硣�������҂����Ը������҃���Ŀǰ�۷e�ă��ݸ߶ȣ���Q���Ѯ�ǰ���d�M���ĈDƬ�ŵ���һ߅�� let col1H = 0;let col2H = 0;
Page({ data: { scrollH: 0, imgWidth: 0, loadingCount: 0, images: [], col1: [], col2: []
}, onLoad: function () {
wx.getSystemInfo({ success: (res) => {
let ww = res.windowWidth;
let wh = res.windowHeight;
let imgWidth = ww * 0.48;
let scrollH = wh;
this.setData({
scrollH: scrollH,
imgWidth: imgWidth
}); //���d�M�DƬ
this.loadImages();
}
})
}, onImageLoad: function (e) {
let imageId = e.currentTarget.id;
let oImgW = e.detail.width; //�DƬԭʼ����
let oImgH = e.detail.height; //�DƬԭʼ�߶�
let imgWidth = this.data.imgWidth; //�DƬ�O�õČ���
let scale = imgWidth / oImgW; //����Ӌ��
let imgHeight = oImgH * scale; //���m���߶�
let images = this.data.images; let imageObj = null;
for (let i = 0; i < images.length; i++) { let img = images[i];
if (img.id === imageId) {
imageObj = img; break;
}
}
imageObj.height = imgHeight;
let loadingCount = this.data.loadingCount - 1;
let col1 = this.data.col1;
let col2 = this.data.col2; //�Дஔǰ�DƬ���ӵ�����߀������
if (col1H <= col2H) {
col1H += imgHeight;
col1.push(imageObj);
} else {
col2H += imgHeight;
col2.push(imageObj);
} let data = {
loadingCount: loadingCount, col1: col1, col2: col2
}; //��ǰ�@�M�DƬ�Ѽ��d�ꮅ���t��ՈDƬ�R�r���d�^��ă���
if (!loadingCount) {
data.images = [];
} this.setData(data);
}, loadImages: function () { let images = [
{ pic: "../../images/1.png", height: 0 },
{ pic: "../../images/2.png", height: 0 },
{ pic: "../../images/3.png", height: 0 },
{ pic: "../../images/4.png", height: 0 },
{ pic: "../../images/5.png", height: 0 },
{ pic: "../../images/6.png", height: 0 },
{ pic: "../../images/7.png", height: 0 },
{ pic: "../../images/8.png", height: 0 },
{ pic: "../../images/9.png", height: 0 },
{ pic: "../../images/10.png", height: 0 },
{ pic: "../../images/11.png", height: 0 },
{ pic: "../../images/12.png", height: 0 },
{ pic: "../../images/13.png", height: 0 },
{ pic: "../../images/14.png", height: 0 }
]; let baseId = "img-" + (+new Date());
for (let i = 0; i < images.length; i++) {
images[i].id = baseId + "-" + i;
} this.setData({
loadingCount: images.length, images: images
});
}
}) if (col1H <= col2H) {
col1H += imgHeight;
col1.push(imageObj);
} else {
col2H += imgHeight;
col2.push(imageObj);
} let data = { loadingCount: loadingCount, col1: col1, col2: col2
}; //��ǰ�@�M�DƬ�Ѽ��d�ꮅ���t��ՈDƬ�R�r���d�^��ă���
if (!loadingCount) {
data.images = [];
} this.setData(data);
}, loadImages: function () { let images = [
{ pic: "../../images/1.png", height: 0 },
{ pic: "../../images/2.png", height: 0 },
{ pic: "../../images/3.png", height: 0 },
{ pic: "../../images/4.png", height: 0 },
{ pic: "../../images/5.png", height: 0 },
{ pic: "../../images/6.png", height: 0 },
{ pic: "../../images/7.png", height: 0 },
{ pic: "../../images/8.png", height: 0 },
{ pic: "../../images/9.png", height: 0 },
{ pic: "../../images/10.png", height: 0 },
{ pic: "../../images/11.png", height: 0 },
{ pic: "../../images/12.png", height: 0 },
{ pic: "../../images/13.png", height: 0 },
{ pic: "../../images/14.png", height: 0 }
]; let baseId = "img-" + (+new Date());
for (let i = 0; i < images.length; i++) {
images[i].id = baseId + "-" + i;
} this.setData({ loadingCount: images.length, images: images
});
}
})�@�����@ʾ�ڃ��ЈDƬ��wxml���a���҂����Կ�����<scroll-view>�M���ϣ��҂�ͨ�^ʹ��bindscrolltolower�O�����¼��O ���������L�ӵ��ײ��ĕr���|�lloadImagesȥ�ټ��d��һ�M�ĈDƬ�������@�Ӿ��γ��˟o�ļ��d�� <scroll-view scroll-y="true" style="height:{{scrollH}}px" bindscrolltolower="loadImages">
<view style="width:100%">
<view class="img_item">
<view wx:for="{{col1}}" wx:key="id">
<image src="{{item.pic}}" style="width:100%;height:{{item.height}}px"></image>
</view>
</view>
<view class="img_item">
<view wx:for="{{col2}}" wx:key="id">
<image src="{{item.pic}}" style="width:100%;height:{{item.height}}px"></image>
</view>
</view>
</view>
</scroll-view>���Ͼ�����С�����Ќ��F�ٲ������ֺ͟o���d��Ԕ�����ݣ�����Ո�Pעphp���ľW�������P���£� С������һ�N����Ҫ���d���b����ʹ�õđ��ã������F�ˑ��á��|�ֿɼ����ĉ��룬�Ñ���һ������һ�¼��ɴ��_���á� |
��ܰ��ʾ��ϲ�g��վ��Ԓ��Ո�ղ�һ�±�վ��
��վ�l����Win7������ϵ�y��Win10�������XP������ϵ�y�H�邀�ˌW���yԇʹ�ã�Ո�����d��24С�r�Ȅh�������������κ��̘I��;����t�����ؓ��Ո֧��ُ�Iܛ����ܛ����
��վ�����YԴȫ�������ھW�j�YԴ,���ַ������ę���,Ո���r֪ͨ�҂�(peng896066052@126.com),�҂������r̎��.
Copyright © 2018-2020 ����ľ�L���dվ