|
���x�W퓵ı��|���dz����ı���ӛ�Z�ԣ�ͨ�^�Y��ʹ��������Web���g���磺�_���Z�ԡ������W�P�ӿڡ��M���ȣ������Ԅ����������ľW퓡�����������ı���ӛ�Z�����f�S�W��Web�����̵Ļ��A��Ҳ�����f�f�S�W�ǽ���... �W퓵ı��|���dz����ı���ӛ�Z�ԣ�ͨ�^�Y��ʹ��������Web���g���磺�_���Z�ԡ������W�P�ӿڡ��M���ȣ������Ԅ����������ľW퓡�����������ı���ӛ�Z�����f�S�W��Web�����̵Ļ��A��Ҳ�����f�f�S�W�ǽ����ڳ��ı����A֮�ϵġ������ı���ӛ�Z��֮���ԷQ�鳬�ı���ӛ�Z�ԣ�������ı��а��������^������朽ӡ��c�� ��ƪ���½o��Ҏ����ă������P��CSS��Ԫ�غ�Content���Ե�Ԕ�����������aʾ��������һ���ą����rֵ������Ҫ�����ѿ��ԅ���һ�£�ϣ�����������������^��ƪ�����˽�CSS����x�������÷������aʾ����ӛ���������Ȼ��ȻҪ���Ԫ�������ħ�ơ������������v�v����Ԫ���Լ��������Contet���ԣ��҂�����ͨ�^��Ԫ�ظ��õ،��F����Ŀ��ܣ� ���R��Ԫ��?�f����Ԫ���ҵ�һ�뵽��Ī�^��
?�Ǟ�ʲô���@�ɺ�̎�أ�ԭ����ǂ�Ԫ�ز���������DOM�У�����λ��CSSOM��HTML���a��DOM Tree�о��]��������Ӱ����������ȻЧ���������������@Ҳ����һ�����}�����҂��]�k��ͨ�^JavaScript��ȫ�ٿ�Ԫ�أ��Ҍ�������һ�������v���� һ��Ԫ��������::before��::after�⣬�e©�����µ�Ŷ�� :first-line��ֻ�����ډK��Ԫ�ء������O�ø���Ԫ�صĵ�һ���Ѓ��ݵĘ�ʽ�����õ�CSS���Ԟ�font,color,background,word-spacing,letter-spacing,text-decoration,vertical-align,text-transform,line-height,clear�� :first-letter��ֻ�����ډK��Ԫ�ء������O�ø���Ԫ�صĵ�һ����ĸ�Ę�ʽ�����õ�CSS���Ԟ�font,color,background,marin,padding,border,text-decoration,vertical-align,text-transform,line-height,float,clear�� ::selection��ƥ���x�в��ֵă��ݡ����õ�CSS���Ԟ�background,color�� �Л]�аl�F�еĂ�Ԫ��ǰ�Y��:�еąs��::�أ�::��CSS3�Č������䌍����::selection�⣬������Ԫ�ؼȃɷNǰ�Y���ǿ��Եģ�������Կ��x��ʹ��:�������ׅ^�ւ�Ԫ�غ͂�tʹ��::������߀�ǽ��hʹ��::����߿��x�ԣ������Ծ�postcss�ȹ��ߎ��҂�̎���ͺ��ˡ� ::before��::after��ע����� Ĭ�Jdisplay: inline�� ����O��content���ԣ���tһ�ж��ǟo�ù��� Ĭ�Juser-select: none������::before��::after�ă��ݟo�����Ñ��x�еģ� ��Ԫ�غ͂�Y��ʹ�����磺.target:hover::after�� JavaScript������Ԫ��?�����ᵽ���ڂ�Ԫ�Hλ��CSSOM�У�����҂��H��ͨ�^����CSSOM API����window.getComputedStyle���xȡ��Ԫ�صĘ�ʽ��Ϣ��ע�⣺�҂������ľ����xȡ���o���O�õ�Ŷ�� {- window.getComputedStyle����� -}
data PseudoElement = ":before" | "::before" | ":after" | "::after" | ":first-line" | "::first-line" | ":first-letter" | "::first-letter" | "::selection" | ":backdrop" | "::backdrop" | Null
window.getComputedStyle :: HTMLElement -> PesudoElement -> CSSStyleDeclaration
{- CSSStyleDeclaration�����ķ��� -}
data CSSPropertyName = "float" | "backround-color" | ......
data DOMPropertyName = "cssFloat" | "styleFloat" | "backgroundColor" | ......
-- IE9+�ķ���
CSSStyleDeclaration#getPropertyValue :: CSSPropertyName -> *
-- IE6~8�ķ���
CSSStyleDeclaration#getAttribute :: CSSPropertyName -> *
-- �Iֵ����ʽ�@ȡ
CSSStyleDeclaration#[DOMPropertyName] -> *ʾ���� .target[title="hello world"]::after{
display: inline-block;
content: attr(title);
background: red;
text-decoration: underline;
}
const elTarget = document.querySelector(".target")
const computedStyle = window.getComputedStyle(elTarget, "::after")
const content = computedStyle.getPropertyValue("content")
const bg = computedStyle.getAttribute("backgroundColor")
const txtDecoration = computedStyle["text-decoration"]
console.log(content) // "hello world"
console.log(bg) // red
console.log(txtDecoration) // underline��Content����?���@���҂��ѽ���������::before��::after���Ftooltip��Ч���ˣ����䌍���鏊����Ҹ��軨�r�g�о��IJń�Ҫ�_ʼ�أ��Ǿ���Content���ԣ����H�H���Ժ���ֱ�ӵ��O��һ���ַ��������Ԫ�صă��ݣ���߀�߂�һ���ȵľ�����������������attr(title)�ǘӣ����丽��Ԫ�ص�title��������contentֵ������Ո���S�Ҟ��ҽ�B�ɣ� p::after{
content: "��ͨ�ַ���";
content: attr(��Ԫ�ص�html�������Q);
content: url(�DƬ�����l��ҕ�l���YԴ��url);
/* ʹ��unicode�ַ���������4λ16�M�ƾ��a
* ����ͬ�Ğg�[���@ʾ���ڲ�������ƄӶ��R�e�ȸ���
*/
content: "\21e0";
/* content�Ķ���ֵ��������M�ϣ�������ͨ�^�ո�ָ� */
content: "'" attr(title) "'";
/* ����Ӌ���������ڲ��딵��/��ĸ/�_�R���־�̖
* counter-reset: [<identifier> <integer>?]+�����x�����ژ��R����Ӌ���������÷�����<identifier>���Զ��x���Q��<integer>����ʼ��̖Ĭ�J��0��
* counter-increment: [<identifier> <integer>?]+�����ژ��RӋ�����c���H�P�ķ�����<identifier>��counter-reset�е��Զ��x���Q��<integer>�鲽�LĬ�J��1��
* <list-style-type>: disc | circle | square | decimal | decimal-leading-zero | lower-roman | upper-roman | lower-greek | lower-latin | upper-latin | armenian | georgian | lower-alpha | upper-alpha
*/
content: counter(<identifier>, <list-style-type>);
/* �Ը�����Ԫ�ص�qutoesֵ����content��ֵ
*/
content: open-quote | close-quote | no-open-quote | no-close-quote;
}�Q���HTML���w��
��CSS��\A��JS��\uA�� ?���Կ���Content����6�N��ͣ���һ�N�M�Ϸ�ʽ���������ɷN���^���s���҂�������һ�f���� �Զ��xӋ����?HTML���҂��ṩ <!-- HTML ����-->
.dl
.dt{chapter1}
.dd{text11}
.dd{text12}
.dt{chapter2}
.dd{text21}
/* CSS���� */
.dl {
counter-reset: dt 0; /* ��ʾ������.dl�r������dtӋ������0 */
& .dt {
counter-reset: dd 0; /* ��ʾ������.dt�r������ddӋ������0 */
&::before{
counter-increment: dt 1; /* ��ʾ������.dt�r��dtӋ��������1 */
content: counter(dt, lower-roman) " ";
}
}
& .dd::before {
counter-increment: dd 1; /* ��ʾ������.dd�r��ddӋ��������1 */
content: counter(dd) " ";
}
}
ͨ�^counter-reset�����x������Ӌ������ͨ�^counter-increment������Ӌ������ֵ��Ȼ��ͨ�^counter��Q��ʹ���Ă�Ӌ��������ָ��ʹ���ķN��ʽ�� const globalCounters = {"__temp":{}}
function resetCounter(name, value){
globalCounters[name] = value
}
function incrementCounter(name, step){
const oVal = globalCounters[name]
if (oVal){
globalCounters[name] = oVal + step
}
else{
globalCounters.__temp[name] = step
}
}
function counter(name, style){
return globalCounters[name] || globalCounters.__temp[name]
}
function applyCSS(mount){
const clz = mount.className
if (clz == "dl"){
resetCounter("dt", 0)
const children = mount.children
for (let i = 0; i < children.length; ++i){
applyCSS(children[i])
}
}
else if (clz == "dt"){
resetCounter("dd", 0)
incrementCounter("dt", 1)
const elAsBefore = document.createElement("span")
elAsBefore.textContent = counter("dt", "lower-roman") + " "
mount.insertBefore(mount.firstChild)
}
else if (clz == "dd"){
incrementCounter("dd", 1)
const elAsBefore = document.createElement("span")
elAsBefore.textContent = counter("dd", "lower-roman") + " "
mount.insertBefore(mount.firstChild)
}
}Ƕ��Ӌ����?���ڶ���Ƕ��Ӌ�����҂�����ʹ��counters(<identifier>, <separator>, <list-style-type>?) .ol
.li
.ol
.li{a}
.li{b}
.li
.ol
.li{c}.ol {
counter-reset: ol;
& .li::before {
counter-increment: ol;
content: counters(ol, ".");
}
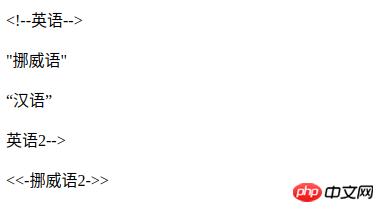
}Content������IE8+��֧��Content���ԣ� ����Opera9.5+������Ԫ�ؾ�֧���⣬�����g�[���H������:before,:after��ʹ�ã� �o��ͨ�^JS�@ȡCounter��Counters���\��Y�����õ��ľ�ֻ����"counter(mycouonter) \" \""�� �Զ��x��̖?��̖�@��ƽ�r��������ķ�̖���䌍�ڲ�ͬ���Ļ���ʹ�õ���̖�����M��ͬ���纆�w���ĵ^ʹ�õ�""�����ձ��tʹ�á��������҂����������Զ��x��̖�أ����ǿ϶��ġ� p[lang=en]>q{Ӣ�Z}
p[lang=no]>q{Ų���Z}
p[lang=zh]>q{�h�Z}
p[lang=en]>q.no-quote{Ӣ�Z2}
div[lang=no]>.quote{Ų���Z2}CSSƬ�Σ� p[lang=en] > q{
quotes: "<!--" "-->"; /* ���x��̖ */
}
p[lang=en] > q.no-quote::before{
content: no-open-quote;
/*���� content: none;*/
}
div[lang=no] > .quote {
quotes: "<<-" "->>";
}
div[lang=no] > .quote::before {
content: open-quote;
}
div[lang=no] > .quote::after {
content: close-quote;
}
ʾ���ָp.sep{or}.sep {
position: relative;
text-align: center;
&::before,
&::after {
content: "";
box-sizing: border-box;
height: 1px;
width: 50%;
border-left: 3em solid transparent;
border-right: 3em solid transparent;
position: absolute;
top: 50%;
}
&::before {
left: 0;
}
&::after {
right: 0;
}
}ֻ�xЧ��(ͨ�^����ԭ����Ԫ�،��F).input-group {
position: relative;
&.readonly::before {
content: "";
position: absolute;
width: 100%;
height: 100%;
top: 0;
left: 0;
}
}Ӌ����.selections>input[type=checkbox]{option1}+input[type=checkbox]{option2}
.selection-count.selections{
counter-reset: selection-count;
& input:checked {
counter-increment: selection-count;
}
}
.selection-count::before {
content: counter(selection-count);
}���Ͼ���CSS��Ԫ�غ�Content���Ե�Ԕ�����������aʾ������Ԕ�����ݣ�����Ո�Pעphp���ľW�������P���£� �Wվ���O��һ���V�x���g�Z�����w���S�ͬ�ļ��ܺ͌W������ʹ�õ����a�;S�o�ľWվ�� |
��ܰ��ʾ��ϲ�g��վ��Ԓ��Ո�ղ�һ�±�վ��
��վ�l����Win7������ϵ�y��Win10�������XP������ϵ�y�H�邀�ˌW���yԇʹ�ã�Ո�����d��24С�r�Ȅh�������������κ��̘I��;����t�����ؓ��Ո֧��ُ�Iܛ����ܛ����
��վ�����YԴȫ�������ھW�j�YԴ,���ַ������ę���,Ո���r֪ͨ�҂�(peng896066052@126.com),�҂������r̎��.
Copyright © 2018-2020 ����ľ�L���dվ